Friday, November 4, 2011

Weekend Warriors

I just LOVE weekends.  Not only because I get a break from the office, but also because of all the adventures that lay ahead. The only thing I don't like about the weekends is that Monday always comes too soon.

A few weekends ago, we actually had not a single plan on the calendar.  You know what that means: PROJECT WEEKEND!!!! I tend to refer to us in this situation as weekend warriors.  I got the urge to look up the Urban Dictionary definition of this and it cracked me up.  This weekend of course, was an epic weekend! Here's Urban Dictionary's definition:
weekend warrior a person who holds a regular job during the week which restricts their ability to party/go on trips/partake in awesome activities, and thus plans epic weekend adventures to compensate. As much variation and quantity of awesomeness is packed into the weekends as physically possible, warranting the rest of the work week to recharge for the next weekend.
So yes, the hubby and I "partook in awesome activities with as much variation and quantity of awesomeness packed into our weekend as physically possible".  Our standard Saturday morning routine includes letting the dog out, giving her breakfast, then laying in bed and discussing the plans for the day.  I was totally stoked when Joe suggested the first project on the list. Here's a look at the projects we worked on and their story:

Kitchen Cabinet Update
Our house was built in 2000. The cabinet style in that day (not so long ago) included a piece of trim over the sink connecting the cabinets on both sides. I've always thought it looked a bit funny and I told hubby a while ago that I really didn't like it and the main reason was that I wanted a pendant light where the can light is above the kitchen sink. I was so excited to get this project going!  Here's a picture of the kitchen before.


And here's the style I'm dreaming for: a pendant light, the spring curtain rod, rings holding the curtain....the cabinet color? not quite my thing. I'll stick with our oak.
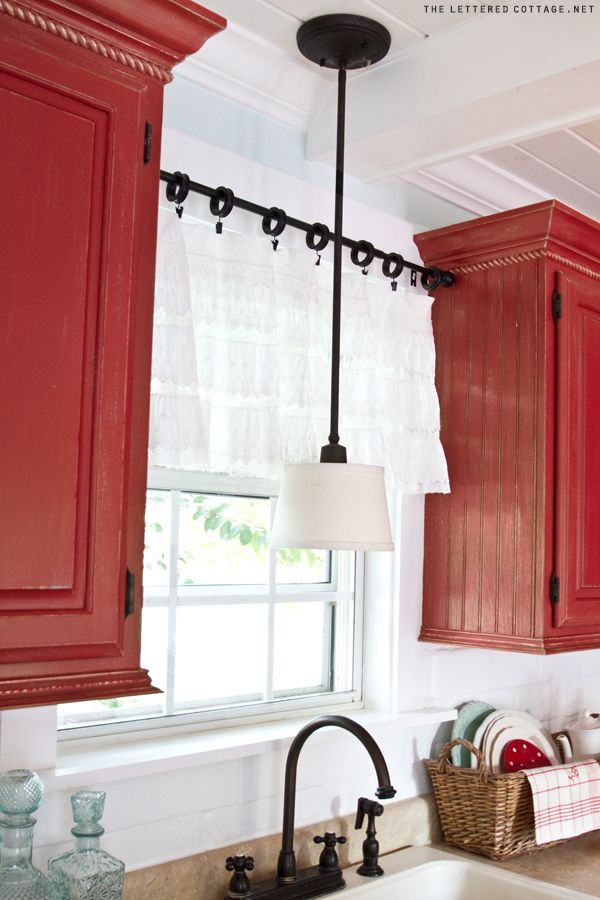
Source

Here's the steps we took:

1. Hubby used a small pry bar like this one to remove the long molding piece along the front of the cabinet and the piece placed below the molding.  
2. We tried to remove as many of the old nails as possible.  This was really difficult and we ended up just breaking them off and hammering it as flat as possible on the wood so there wasn't a gap when we placed the molding back up there.
3. We measured the length of molding needed on the sides of the cabinets and marked where that would be on the long molding piece. Hubby used his miter saw to cut the trim to the proper lengths.  I must say figuring out the angle was a bit tricky, so be careful if you're trying this at home.  It's definitely a measure 8x, cut once kinda thing.
4. Joe reattached the molding pieces and puttied any areas that will need sanded and re-stained.  
5. Since Daisy HATES the compressor and the nail gun, we took a little trip to Lowe's to pick up a recessed can conversion pendant light kit to hang. During our trip to Lowe's I hit the jackpot.  I know I just went for 1 thing, but I left with with two more projectss.  When walking to the lighting section, I noticed on the clearance rack, a chrome 3-light vanity fixture (just like the one we've been looking for), and they were clearancing out a TON of fans (also, just what we've been looking for).  So convenient right?
6. We hung the pendant light fixture kit and LOVE the final product.  We've still got to match the stain to patch up some small spots, and update the curtain rod, but here's the almost finished project.


I made the curtain from some linen material.  I'm posting the tutorial soon, so watch for it.

Here's the breakdown:
  • Small Pry Bar: $0
  • Measuring Tape: $0
  • Miter Saw: $0
  • Nail Gun (and compressor): $0
  • Stain (from Lowe’s): $8 (Still needs to be done)
  • Pendant Light Converter Kit (from Lowe’s): $30
  • TOTAL: $38

Guest Bathroom Light Fixture
As discussed above, the coming about of this project was due to the trip to Lowe's to purchase the Pendant Light Converter Kit for above our Kitchen sink.  We already replaced the cabinet pulls and the sink faucet, but couldn't really find a new light fixture to match the style.  Here's the before and after of the fixture.


Here's the breakdown:
  • 3-Light Vanity Fixture (from Lowe's): $40

Basement Fan
Again, this project sprouted from the Kitchen Cabinet update with the Pendant Light Converter Kit.  The gold fan in the basement was really getting to me, especially after painting the room and rearranging the set-up. Here's the before and after in the room.


Here's the breakdown:
  • Fan Fixture: $40

Entryway 
I was totally inspired by Jenna Sue's entry way art and coat rack so I thought I'd come up with my own version.  Her art work is wonderful.  I love the geometric patterns and the simpleness of it.

Source
I also really LOVE the idea of having knobs as coat hooks.  I really was inspired by these drawer fronts used as coat hooks.

Source

We've haven't finished the project yet, but we're about halfway there.  We'll be finishing it up soon and revealing our entryway soon!


Kennedy's Baby Quilt
I started this baby quilt a few months before the baby was due.  Before I was finished, a beauty came along.  There is a precious little baby girl that is so adorable, Kennedy Caroline.  She was born in July with some life threatening issues.  She is such a fighter and is now doing very well.  I was inspired to design a quilt from the breathtaking one below.

Source
I designed my own pattern to be the perfect size for baby Kennedy.  Over the weekend I finished quilting, then a few days ago I made the binding and completed the quilt.

I can't reveal it just yet.  I have to make sure that Kennedy and her momma get it first.  I'll post soon though.

I can't wait to see what this coming weekend has in store!

What projects are on your plate?

Wednesday, November 2, 2011

Fall Pinterest Challenge Project

Oh Pinterest, how I love you.
Each and every day I explore your world and find even more reasons I love you.
I LOVE the Pinterest Challenge Fall Edition.


And now, here's your hosts:
Sherry of Young House Love 
Katie of Bower Power
Ana of Ana-white.com
Erin of House of Earnest 

I unfortunately am one of those people who has about 15-20 projects going at one time. It usually takes me a long time to finish a project since I have so many going at one time.  I really need to work on this! Here's a few pins that are currently being worked on at my house:


So there's five things I didn't finish for this Pinterest Challenge.  I'll try to finish them soon and post them here.

Make sure you check out the hosts' blogs listed above to see what other bloggers have completed with the Pinterest Challenge: Fall Edition.

What have you been pinning or working on lately? Leave link and I'll go check it out.

Monday, October 31, 2011

Countdown to Halloween...Even Though It's Halloween!

I have recently come to LOVE Halloween!  I'm not sure why I never really got into it in college.  I love the idea of spooky yard decorations, creepy cob-webs, pumpkins, and the best part: the food that goes along with it.

One of my favorite crafts seen last year is the countdown wooden cubes.


I think these blocks are sooooo cute!  I love how easy they are!

Here's the supplies needed:
- Two square blocks (mine were 2" x 2" from Hobby Lobby priced $0.99 each, on sale 50% off)
- Mod Podge Gloss (already had some but costs about $5)
- Foam Brush ($0.25)
- 6 different Halloween scrapbook paper

Directions:
- First you should paint the blocks.  I painted mine white. I've seen others painted orange and black.
- Use scissors or a paper cutter to cut the scrapbook paper to fit on the blocks.
- Use a foam brush to apply Mod Podge to the block and the back of the and place on the block.  Then paint Mod Podge over the top of the paper to seal it.  
- Cut out numbers or use some larger stickers.  Apply the same way you applied the square paper. 
- Apply a final coat of Mod Podge and let dry.

Place them out for everyone to see!

Here's My version!

Halloween Countdown Blocks

Happy Halloween!
Now, back to handing out candy.

Wednesday, October 12, 2011

Top 10: Fall Decor Wish List

I love Fall!

I love the textures, colors and scents.  My favorite thing about fall is really the leaves.  The colors are just so warm and wonderful.  I'm just glad we don't have big trees at our house yet.  Raking leaves are not my favorit thing.  Hopefully you don't have too many leaves to rake up this year.

I also love decorating my home with the warm colors and wonderful scents of fall.  Here's a few things I just can't wait to get my hands on! I see home decor shopping in my near future!

1. Sphere Table Lamp (west elm, $99)
2. Acorn Vase Filler (Pottern Barn, $14.50)
3. Large Square Farmer's Market Basket (Anthropologie, $20)
4. Metallic Leaf Votive Holders (Pier 1, $7.95)
5. Zambales Tray (Crate&Barrel, $42.95)
6. Rattan Wall Decor (Pier 1, $59.95)
7. Talin Wall Clock (Crate&Barrel, $169.00)
8. Rona Amber Placemat (Crate&Barrel, $9.95)
9. Embroidered Square Pillow (Pier 1, $34.95)
10. Shaded Spruce Chenille Throw (Pier 1, $39.95)

What are some of your favorite things for fall?

Thursday, September 29, 2011

Fall Fashion

Recently, I took some time off work just because.  It was a nice little vacation.  I got a few things done around the house and relaxed a little.

I was able to catch my favorite show of all time: The Nate Berkus Show. I just LOVE that show!  I was really inspired by their segment on 30 Fall Looks Using 8 Items under $150. Here's some of my favorite outfits from the segment:

Neutral Dress, Black Belt, Leopard Print Shoe
A neutral dress can be accessorized by a black belt and a leopard print shoe. Apparently leopard print shoes are big right now and never go out of style.

Red Pants, White Shirt, Skinny Black Belt, and Black Pumps
Red is a hot color this season.  Paired with a dressy, white shirt and black pumps this look is definitely one of my favorites.

Polka Dot Shirt
Polka Dots are HOT this year! Love them!

Black and White Stripe Sweater, Skinny Jeans, Boots: border=
I love this look of a striped sweater with jeans and a pair of boots.  I'm usually not a fan of black and tan together, but this looks fantastic!

Red Pants, White Shirt, Leopard Print Shoes, Cream Cardigan
This color combination and style combination is sophisticated yet fun.  Perfect for shopping with friends or lunch with the girls.

Black Long Sleeve Shirt, Colorful Scarf, Dark Wash Jeans, and Nude Shoes
Scarfs aren't typically my thing, but the colors in this scarf just scream fall!

Here's a board with some of the pieces!
Olioboard: Fall Fashion

I CAN'T WAIT TO GO SHOPPING!!!!
(see the 30 Fall Looks Using 8 Items under $150 page comments for shopping list)

What are your favorite wardrobe pieces for fall?

Linked here: Mine for the Making

Saturday, September 24, 2011

Light Fixture Transformation

I'm not sure if you know this, but light fixtures are expensive!!  I was in absolute shock!

My husband and I are trying to rid our house of the Gold EVERYTHING!   They are so hard on my eyes. Now don't get me wrong, I love shiny things but this just hurts my eyes.

Light Fixture Before Painting

We've been scoping out http://www.craigslist.com/ for fixtures for the past few months and... nothing :(  I finally had enough of the gold light fixtures in our bathroom, closet, guest bedroom, and basement entryway.  I read quite a few articles on spraying fixtures and ta-da they look so good!  You can't tell they're spray painted right?  Check out what a difference the paint made! 

Bathroom Light Fixture after Spray Paint

Bedroom Light Fixture After Spray Paint
I know, the glass shades definitely dated them, but at our house we go step-by-step.

We actually did this process many months ago, and I'm just now getting it posted but here's the process:
  1. Caution: Be sure before you begin this project you turn off the electricity to the fixture from your breaker box.  We don't need anyone being sent to the Emergency Room with 'electricution' written on their charts.
  2. Remove the light fixture from the ceiling/wall/ etc.
  3. Disassemble and clean the fixture.  We removed all screws, sockets, and fiberglass insulation and were left with bare metal ceiling plates that didn't need any taping up.  Just remember where everything goes unless you want some extra parts here or there.
  4. We used KRYLON Satin Nickel paint from Wal-Mart (about $2).  Two thin coats of paint later, our light fixtures have completed their makeover.
  5. The only thing left to do is re-assemble, install, and admire!  
P.S. If you have assembly issues or installation issues like we did because we didn't pay attention to which wires we disconnected from which wire, just search the Internet for solutions.  BUT Be very cautious when turning the breaker back on if you're not sure.

Disclaimer: We are in no way professionals.  If you're cautions about installing light fixtures in any way, please be safe and contact a professional to install them.


Remember that day of garage sales during which I found the blanket chest?  (Post found here) I was luck enough to find some beautiful nickel light fixtures with alabaster glass to replace the light in the guest bedroom and entryway.  Now they look even better! See?

New Nickel and Alabaster Entry Way Light Fixture

Sunday, September 18, 2011

Strawberry Lemonade Cupcakes

One of my favorite cake and cupcake blogs is Half Baked. They have such delicious looking posts.  I always get a craving when I read their blog.  Yum!  When I saw their post on Strawberry Lemonade Cupcakes I practically dropped everything and ran to the kitchen.  They turned out fantastic.  Everyone at work thought so too. I would highly recommend these for any summer party or BBQ. Here's a link to their recipe and pictures.  Beware: they may create the desire to bite the screen!

Strawberry Lemonade Cupcake

Strawberry Lemonade Cupcakes
{makes 24 cupcakes}
For the cake:
2 sticks unsalted butter, room temperature
2 cups sugar
4 eggs
3 cups all-purpose flour
2 tsp baking powder
1/2 tsp salt
1/4 cup lemonade powder mix (I used Country Time)
1 cup milk
3 Tbsp lemon juice (juice of 1 lemon)
1 Tbsp lemon zest (zest of 1 lemon)
1 tsp vanilla
lemonheads (optional)
  1. Preheat oven to 350 degrees and line muffin pans with cupcake liners
  2. In medium bowl mix together dry ingredients: flour, baking powder, salt, lemonade powder and lemon zest, set aside.
  3. In bowl of stand mixer cream butter and sugar on medium speed until combined.
  4. Add eggs, one at a time beating well after each addition and scraping down sides of bowl as needed.
  5. Add the lemon juice and vanilla and mix well.
  6. Gradually add the dry ingredients and milk, alternating starting and ending with the dry ingredients and mix until combined.
  7. Fill cupcake liners about 2/3 full.
  8. Bake for 20 minutes or until toothpick inserted in center comes out clean.
  9. Let cupcakes cool in pans for 5 minutes, then remove to wire rack to finish cooling.
  10. Once cupcakes are completely cool, ice with Strawberry Lemon Frosting and garnish with a lemonhead on top.
For the frosting:
2 sticks unsalted butter, room temperature
4 cups confectioner’s sugar
3 Tbsp strawberry puree (from about 3-4 strawberries)
1 tsp lemon zest
  1. In bowl of stand mixer cream butter for 1-2 minutes.
  2. Gradually add confectioner’s sugar and continue mixing scraping down sides of bowl as needed.
  3. Mix in strawberry puree and lemon zest.
  4. Place the icing in a piping bag fitted with tip 1M to decorate cupcakes.


Friday, September 16, 2011

Blanket Box

Since we moved into our house and I started exploring blogland, I've wanted a bench of some sort at the end of our bed.  Our room is perfect for one, long and skinny.  I searched for an inexpensive blanket box or decorative bench at a few places on the internet.
Here's a few inspirational photos I discovered:

I love the idea of benches.  They look so elegant without looking too bulky.
Source

Here's kind of a combination style.  Upholstered and a chest perfect for storage.
Source

Here's an example of the traditional wooden blanket chest that I'm really imagining for the space.
Source

I found this one for $249 from Target, but the price is just a bit steep for me.


It was a typical Saturday morning and I was out searching garage sales for some wonderful finds. And then I saw it.....it was perfect! Well, not really.  It was pretty beat up, but I paid a whole $5 for it.  After cramming it in my car and getting it home, I immediately had regret.  What if Hubby can't repair all the cracked and broken pieces?  What if he doesn't want to re-finish it and stain or paint it? Within 15 minutes of wrangling it out of my car, my hopes of finally having a blanket chest were falling fast.  

So when Joe came home and saw the falling apart plywood he was less than pleased.  Then he found out I only paid $5 for it.  His opinion did a 180.  I was so excited I could barley contain myself.  I couldn't believe he was up for the challenge. 

A few weeks later we were out shopping at Lowe's for some other stuff when he dragged me over to the wood stain.   We took booklet of colors home and compared them to our bedroom furniture to see if we could find one similar.  I was amazed when we found an almost identical match! Minwax Red Mahogony.

Red Mahogany Stain

Hubby labored a few hours to sand down the chest, stain it and poly coat it.  I'm so impressed with the turnout. He did a fantastic job and I LOVE the way it turned out.

Master Bedroom Blanket Box

It's perfect for our blankets, extra towels, and extra sheets.  See, we don't have a linen closet so our extra linens hung out in the guest bedroom dresser.  Now they have a new home in our wonderfully refinished chest.  What a beauty!

Inside our Blanket Box

Here's the beauty in a close-up.

DIY: Blanket Box

I think I'm in love!  Thanks Hubby for your hard work.  Our room is closer to being complete.

Cost Breakdown:
Chest: $5
Stain (from Lowe's): $8
Poly: $0 (already owned)
Foam Brushes (3: 2 for stain coats, 1 for poly coats): $1.50
Total: $14.50 definitely much less than the Target option.